Showing posts with label windows tuts. Show all posts

Sunday, 16 February 2014

How to check the font online used in an image
supreethSunday, 16 February 2014 0 comments


we all have that one habit of curiosity to look into trolls, images and logos. Have you ever  wondered  about the font used in it? Then its the right tutorial. Recently i saw a logo of my friend’s blog legendary geeks you may have heard it while browsing pages it was a quite exquisite logo i wondered , it was a professional thing, rather than asking him about this i started to research on this days together and finally made this tutorial
SO let us begin with choosing the width image or logo
First of all download the image. for nerds- by left click select-“ save the image as” option and save the image

How To Recognize font in image- 

Note up

Note the following tips while choosing the image or adjusting it


  • ·        Try to get horizontal images not diagonal or something weird
  • ·          Letters must probably around 100 pixels tall in your image
  • ·         Make sure letters aren't touching each other.
  • ·         Make the maximum 10 letters minimum 4
  • ·         ideal max. size of the containing NO descends
  • ·         120 pixels x 1666 pixels
  • ·         Ideal max. size of file containing
  • ·         160 pixels x 1250 pixels
  • ·         Also make sure it is greyscale or background is white

Sneak up the snap

So let us start note the rule and get a image as i brought


Legeeks logo and converted it to a white background you can do this  by going to Microsoft paint and select all and invert color by left click i have also removed the stick thing which was obviously not a part of the logo


We have got everything ready and now we need help of some internet
Internet is a vast network here i got hold of  a company named my fonts where i used to sell and buy fonts

This is where I got the solution
Recently my fonts launched a page called whatthefont
WTF its a common term now!! But it means different here what the font provides a easy solution to all the images to find out the fonts used in it but how here’s the solution i am going to show you step by step tutorial to find out perfect font using it by your image

Steps to the success

#step-1 upload  the picture to the app

Log on to
choose the image as shown  in below screenshot:
choose a png or tiff both are better for the app and click on continue it redirects your tp the next page


#step-2: character selection 

it would be a easy task if you know English!! Because sometimes the app might mislead the letter l to i  or o to a only in specific fonts so this would be an important task to do in the steps

In the screen shot the app got it completely wrong as it is tough font i corrected it from 9 to s h to k etc and click on continue when you finish writing it choose the right letters because its the important thing for a font if you don’t know which letter ask the image holder


#step3- choose the right one

You will be redirected to the page where you are going to select the right font from the list there would also be keywords which are related to your logo as mine showed futuristic techno or any thing like that we know what is what and which suits the best and which would match exactly like the thing i got the font as bauer after getting the right font make a click on the font and you will be redirected to the page


#step4-get it at the right price


You will be directed to a buy page where you get all in one in info and details and price tag at the top so have you decided to buy it? Well mine it was 70$ so i decided to get it for free!?? Shocked or not i will get it at free by googling it and doing, i will show  how i got it
   Sub tut step –a
i have googled my font bauer and
These were all the sites where you have to buy things out but no money then scroll down i have a surprise


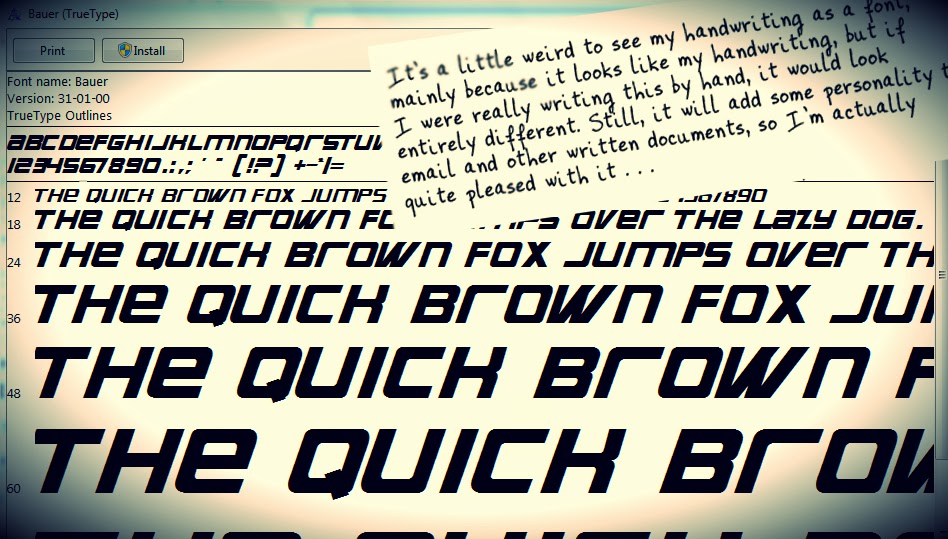
I got it in below some results the ffonts.net the coolest all in one site to get fonts for free of cost in this site i got my rar font package downloaded at my pc now to install it

Click and open the extracted file it’ll open a new window displaying a “ when fox jumped over.... thing” as shown in screenshot click on install button and confirm it and poof done

You can thank us or ask questions by commenting below!!


 Conclusion

 Hell yes We have the internet and power to control the world, with this app we can know the secrets of logos and conquer the graphic world
For more such exciting tutorials stay tuned @techknowblogging.com

Monday, 3 February 2014

Solved: Windows 8 & 8.1 “We Weren’t Able to Connect to the Store” Error
supreethMonday, 3 February 2014 0 comments

We all know that windows 8 was a bad one but i am sure 8.1 was a grand success. When i tried to log on to my 8.1 pc To some  weird reason, several apps on my pc blank up that it  would not connect to the Internet and it cannot connect to the Windows Store. I was definitely connected to the Internet because I could check my mails  using Chrome, so it was irony why it couldn’t connect to the windows Store or why certain apps could not work. I hate this “We Weren’t Able to Connect to the Store” Error when it covers my screen
recently, I googled it and heard them talking regarding this, however all the same old ways for fixing this drawback haven't worked: checking the date/time on your laptop, using the netsh and wsreset commands, employing a native account rather than a webaccount and making an attempt to refresh your computer. I had actually tried most of those options because it happened to be once before i also tried running wsreset, which seemed to have worked for a minute, after it blank up the same old message:
However, none of the options found on google worked. After so many freaky expirements I finally figured out that it had something simple to do with the Live account(outlook), what we are going to do is account must to be verified and then everything will start working like before. In my live id, the account was verified, but I had two-step verification enabled(soooo boring) where I had to type my authenticator code in.


Now let us start

Method 1 – Authorise

Start the task by going to Settings on your windows8 or 8.1 pc by moving your cursor to the right side of the screen. Then tap on Change PC Settings at the bottom of very screen.


Now tap on Accounts in the left side menu.
Here is where you’ll see the critical info what is causing trouble onthe Windows Store. If it’s a mail verification problem, you’ll see “You need to verify your account.” under your email address. Otherwise it’ll blink up Disconnect. If you have two-step verification enabled on your mail, the pop up says “You need to update some info for your Microsoft account” with a link called Update info.


Click on that Update info link and it’ll bring you to a screen where you have to enter the code generated from your authenticator app.

Method 2 – Check Date & Time

if the first step didn't really work out then this step is to do is make sure the date and time on your Windows 8 PC is set correctly. You will not be able to hook up with the store if your system time isn't correctyou'll fix the time by opening the Charms bar (Windows Key + C) then typewriting in Date and Time.
Now you'll be able to click modification date and time to line the system to the proper time. Also, ensure you’re set to the proper geographical zone additionally.

Or you can click on internet Time, click on amendment settings so click on Update now. this may automatically synchronise your pc with time.windows.com.


then try to open the Windows Store  and see if it is able to connect. it might!

Method 3– Log Off/Use Local Account

The next thing you'll be able to strive is work off your account and so log back in, particularly if you're employing a Microsoft account. Also, move to https://login.live.com/ and make certain you'll be able to login along with your Microsoft credentials. If you're bolted out for any reason like your account being hacked, etc, then you will ought to restore access to your Microsoft account and so login again in Windows 8.


The other thing you'll attempt is to change from a Microsoft account to an area account then attempt to open the Windows Store. you'll do this by progressing to the Charms bar, clicking on Settings, then clicking on modification pc Settings then clicking on Users.

Method 4– Proxy Server


The other go you wish to try is that if your system is going through some proxy server. If it is, you'll be able to try and disable the proxy server and see if that lets you connect to the shop. you'll be able to do this by clicking on the gear icon at the highest right, then clicking on web options.
Then tap on the Connections tab and click on the LAN Settings button.

Go ahead and uncheck the Use a proxy server for your LAN box.

Go ahead and uncheck the Use a proxy server for your LAN box.
Now try to connect to the Windows Store . If not, keep reading.

Method 5 – Refresh Your PC

The last item you can do is refresh your computer. this can be not ideal as it will reset all of your apps from the Windows Store and take away any third-party programs you put in from a CD/DVD or the web. However, if nothing else is working, then this might be your only option.

You can move to computer and click on on General. Scroll down and you’ll see Refresh your computer without loosing your files.happy browsing goodluck

Hopefully one among these methods mounted the cannot connect with Windows Store downside on your Windows eight machine. If not, post a comment here and I’ll try and help. Enjoy!

Sunday, 26 January 2014

How To Resume Last Browsing Session In Firefox, Chrome, Safari and Opera
supreethSunday, 26 January 2014 0 comments


Many of us usually shut down clumsily when we have many important tabs/websites open in your browser. You want the same old important tabs to show up when you again access the browser. now i will be showing you how to make it go on almost all known browsers such as google chrome, opera, safari and firefox. Almost all of the windows users go for chrome its genuine experience is awesome do let us start with chrome Now lets start give below are methods for your browsers to resume last browsing session and load your previously opened tabs.
Google Chrome
   1. Click the Chrome menu  on the browser toolbar.
 2. Click on ”Settings” located in the seventh option all the way down in the menu
Resume-Browsing-Session-OS-X-Open-Chrome-Settings
3. Under “On Startup” tab in menu, enable the option “Continue where I left off“.
Resume-Browsing-Session-OS-X-Chrome-Continue-Where-Left-Off
Try it  test it out make sure you get the same number of tabs. Open a group ofsites in different tabs, close your browser, and open Chrome again. The tabs should all be restored.
Opera
1. tap up the Preferences menu in the Opera browser Menu.
Resume-Browsing-Session-OS-X-Preferences-Pane-Opera
2. click on the option “Continue where I left off” below “On Startup” pane.
Resume-Browsing-Session-OS-X-Continue-Where-I-Left-Off-Opera
3. Close the window
Please Note:  this method may not work on your Opera sometimes. While testing it If browser doesn’t open your previous pages, go to “History _ Reopen last closed window” to open your previous tabs
Now, poof done!  You have 0 chances of losing your previously opened tabs, if your browser crashes or even if you close it clumsily. This is also useful if you frequently open the same bunch of sites every time you open your browser like it was use full for me as a blogger I always use blogger, google analytics, check my mails,then open up google plus .
And though I’m also that type of blogger who has a habit of keeping more than 20 tabs open at one go, I’d recommend not doing like it. Why?, doing so is sure to slow down your internet connection also your PC,. You’d be better off saving your tabs/websites in bookmarks for future viewing.


Mozilla Firefox
1.   tap on the ”Preferences” tab on the Firefox  browser menu.
Resume-Browsing-Session-OS-X-Preferences-Pane-Firefox
2. Open up the common tab. Under the Startup pane, select the option “Show my windows and tabs from last time” from the “When Firefox starts” drop-down menu
Resume-Browsing-Session-OS-X-Firefox-Show-Previous-Tabs
3. Close the window  which will save the settings
Please Note: In this phase, Firefox browser has a better thing at managing the tabs. When you reopen Firefox browser,browser doesn’t load the page until the tab is opened fully. This makes sure that the browser doesn’t hang on startup. For Google Chrome, it will load all the /tabs on startup and you have to wait for a while before you can use the browser.
Apple Safari
1.  click and open the Preferences from the Safari menu in the upper-right corner.
Resume-Browsing-Session-OS-X-Preferences-Pane-Safari
2. tap  “All Windows from Previous Session” option   below the ”Safari opens with” drop down menu
Resume-Browsing-Session-OS-X-Safari-All-Windows-From-Last-Session
2.    Close the window which will automatically save the settings

Conclusion
i always advice you guys , this tutorial is a very good one for a personal user, indeed a not be guided for professional bloggers or entrepreneurs or other official uses, hey don’t be scared i m just suggesting that it would hang and make a fuss upon on your PC  J
comment down with g+ if you can or if you love this tutorial or with issues regarding this topic

Saturday, 18 January 2014

how to optimize and speed up windows 7 pc
supreethSaturday, 18 January 2014 0 comments


Guys we all have windows 7 pc’s and its damn slow right? in this tutorial we are going to optimize and speed up Windows 7 performance. Now lets start how we can do this by customizing and using some Windows features. Some of these options are also available in Windows 8 and earlier versions of os’es;. how many of you encountered slow performance?, errors or even blue screen of death when using Windows os, but me no ways! I’ve been working with Windows 7 and 8 for quite some 4 years from now and I can definitely say that default configurations of this OS can be utilised so that better results in terms of boost in performance
, when running applications that use of lot of RAM  sometimes encounter slow performance. We should choose your hardware configuration according to your needs (what are you going to do on pc ex gaming or for personal). .

#1.  Cleanup the disk, Run Defrag and Run check disk

These tools are default in a windows pc and are used to speed up the performance of your hard disk. First right click on the desired partition (where the OS is installed) and then click “Properties”. then select the “Tools” tab and click on one of the tools listed here:


The “defragmentation tool” will align data block in  your hard drive in enjoin to make them easier to be accessed by the windows OS. The “Errorchecking” tool will fix any bugs, errors from your harddisk. Then  Open “command prompt” and type the following:


The “/r” parameter will locate the bad sectors( the things with error) and will recover readable data, and will also fix disk errors.

The “Disk Cleanup” tool will delete unnecessary data stored on your pc, such as temporary internet files, debug files, etc.  To go to this tool search “Disk Cleanup” in the search bar. You will then be redirected to enter a disk partition where the tool will execute. After calculating the disk space gained, you will be prompted to the following screen:
Check all the things that you don’t want and then click the “OK” button.


#2. Disable unwanted effects

 Windows comes by default with some cool geeky theme effects activated(whic actually is not geeky!). Features like Windows Aero, shadows or thumbnails can be disabled to boost your computer’s performance. Right click on “My Computer” on desktop and then select “Properties”. After the window opens, hit  the “Advanced system settings” tab. You will then be shifted to the following screen:

on the “Performance tab” click the “Settings” button. then, select an option from the available options. Now we can adjust settings for “best performance”, “best appearance” or select the features that you want to activate or deactivate

 #3. Upgrade things and definitions


The most vital part in optimizing your computer’s performance is by installing the latest updates. At least, critical and security updates must be updated and pc issues must be solved so that pc can prevent and fix bugs, errors, software intrusions.. Some of these updates can even fix and optimize performance issues.
To install the latest updates go to “Control Panel” and then click the “Check for updates” button. Wait until Windows finds all available updates and then select the ones that you want to install. In the end, you will probably have to restart pc

#4. Disable or un install unused programs that run at startup

 using the Microsoft System Configuration Utility tool We can stop our pc using the programs on startup without your prompt, run it by typing “Msconfig” from the run prompt: 


hit to the “Startup” tab and then deselect the programs that are not mandatory:

#5. Clean the infectant


In many cases your pc can have low performance when it is infected with viruses. The best method of dealing with viruses is by installing an antivirus on it i prefer avast antivirus which is free and genuine .andl can be used before registering or buying it. I’ve worked with this software and I would it recommend to anyone.

 #6 thirdparty optimizing software

a very powerful  tool ccleaner  can be used to improve your computer’s speed. software available for download at http://www.piriform.com/ccleaner. This program will scan all areas of your computer and will clean and fix things like registry keys, temporary files, history and cookies etc.

finnally enjoy your brand new super fast pc


By Supreeth Bharadwaj